Angelcode .fnt Generator
A downloadable tool for Windows
This standalone tool is made for Godot Engine projects. It's used for implementing bitmap fonts easier. Actually, it should work for any engine that uses .fnt files for its bitmap fonts, but I've tested this only for Godot Engine.
More info at: https://github.com/burakyucel07/angelcode-fnt-generator
Usage:
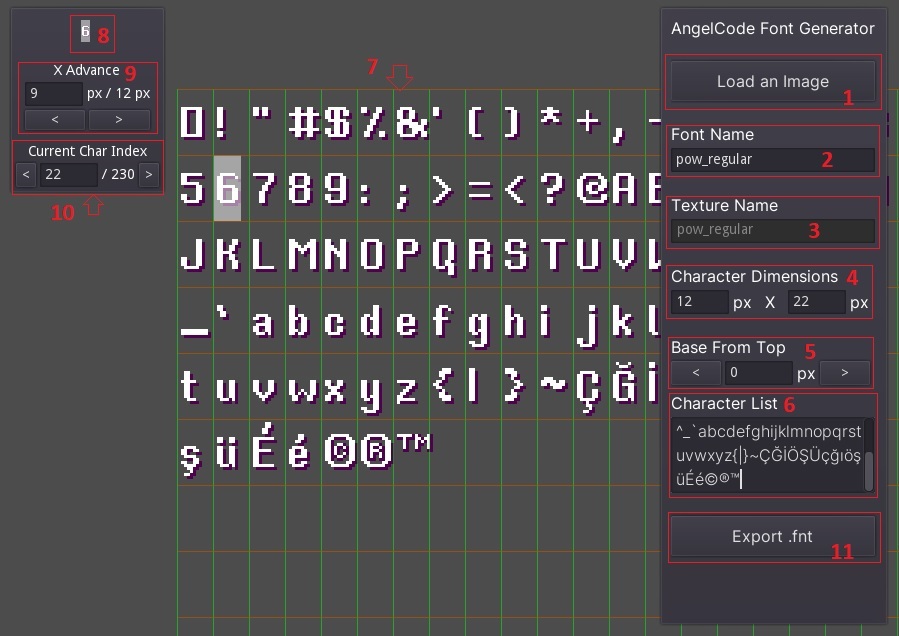
1. Load the .png image using this button. You should be able to use other files too, like .bmp or .jpg even I haven't tested them yet.
2. Enter the name of the font. This is not the file name of the texture file. You don't have to use the same name with the texture name.
3. This is the file name of the texture file. For example, if you imported the "cool_font.png" file, the texture name is now "cool_font". You can't change this name using the tool. Exported .fnt file will be named as <texture_name>.fnt. For example, if your texture file name is "cool_font.png", your .fnt file will be named as "cool_font.fnt".
4. Enter the character dimensions (width and height). For example, if your character width is 12 and height is 22, enter these values and the tool will calculate how many characters are on the texture horizontally and vertically. In this example, the texture has 231 characters (including the zeroth character). Character boxes will be shown with green squares.
5. Enter the character base starting from the top.
6. Enter the characters in the same order with the texture file. For example, if your texture file has characters of "0123456789", you have to enter these characters in the characters list text area.
7. You can check the characters using this UI. Zoom in and out using mouse scroll.
8. You can see the current character from here. The transparent white part tells how much x advance you are setting to this character. You can check the advance amount using the UI shown in step 7.
9. Set the X Advance using the increase/decrease buttons. Also, you can enter a value but the value couldn't be bigger than the width of characters (You've set this in step 4).
10. You can switch to the next char or previous char using these controls. In the example, it says this texture has 231 characters (character index starts with 0) with the info you've given.
11. Export the .fnt file using this button. .fnt file will be exported to the same directory that the texture file is in. If there is a file with the same name, the tool will ask if you want to overwrite it.
I'm still developing this project. If you have a suggestion, open an issue at GitHub. This project is Open Source and has an MIT licence.
Note: Somehow Windows 10 doesn't trust the .exe file. It's totally safe but if you still hesitate, you can build the tool yourself with the source code in GitHub. You have to use Godot Engine to compile it.
Download
Click download now to get access to the following files:
Development log
- v0.0.3 UpdateSep 24, 2023
- v0.0.2 UpdateNov 13, 2022
